On macOS there are two volumes, and the keys on my keyboard turn the wrong one.
The volume keys move the system output — everything the Mac makes noise
with, all at once. The Music app has a second volume of its own, a slider inside
the app, and that is the one I actually want when a track comes on too loud.
Reaching for it means finding the Music window, which is usually behind whatever
I am working on, which is the whole problem.
Three fixes, none of them right
Remap the keys.Volume Control for macOS does
exactly this: it takes over the keyboard’s volume keys and points them at the
music player instead. It works. But now I have no convenient way to change the
system volume, and I have simply moved the annoyance rather than removed it.
Buy a cheap USB knob. There are plenty, and they are inexpensive. They
enumerate as a plain USB keyboard and send keystrokes — arrow keys, media keys,
whatever the little configuration tool assigns. That is the catch. A keystroke
goes to whatever has focus, so a knob like this controls Music only while Music
is the front application. Which, again, it never is.
Buy a professional one. A real MIDI control surface can address an
application by name and would do the job properly. It is also a large, expensive
piece of studio equipment bought to solve one small domestic irritation.
So I did nothing about it for a year.
What was in the drawer
Then I remembered the
M5Stack Dial I had bought
for some other project and never used: an ESP32-S3 with a rotary encoder wrapped
around a round touchscreen, about the size of a large bottle cap. It had been
sitting idle long enough that I had to think for a moment about where I put it.
A few minutes of prompting later, Claude had written two things: firmware that
makes the Dial a USB serial device and prints one line per click of the encoder,
and a small Python daemon for the Mac that reads those lines and drives Music
through AppleScript.
Why the daemon beats a HID knob
That daemon is the difference between this and the cheap knob.
A HID knob can only send keystrokes, and keystrokes go wherever focus is. The
daemon does not send keystrokes at all — it asks Music, by name, to change its
own volume. Music does not have to be in front, or visible, or even the thing
I was last using. The knob talks to the daemon, the daemon talks to Music, and
the focus question never comes up.
The Dial cannot run AppleScript itself, so that hop through the Mac is forced on
the design. That constraint is what makes it work.
And then a few more prompts
Having got the hard part working, the rest arrived one request at a time, the
way these things do now:
Play/pause on the side button, or a tap in the middle of the screen
Acceleration, so a slow turn moves 2% per detent and a quick flick moves
four times that
A touch interface — drag a finger around the gauge ring and the volume
follows it
The artist and title scrolling along the bottom of the display
Album artwork in color, sent over the same serial line and drawn inside
the ring
A 3D-printed case, parametric OpenSCAD, a sloped desk stand with a snap-in
floor plate and a recess for a non-slip pad
Volume on the arc, artwork in the middle, now-playing scrolling along the bottom. The case took as many commits as the firmware.
There is also a demo mode, which I did not ask for and immediately liked: if the
knob hears nothing from the Mac for five seconds — because it is running off a
USB battery on a table somewhere — it fakes the whole thing locally and labels
the screen so nobody is fooled.
What actually changed
The interesting part is not the knob. It is that the knob had been three
evenings of work away for a year, and three evenings was more than the problem
was worth.
Firmware, a daemon, and a case are each a small job and together they are a
project. What collapsed was the cost of the small jobs: about 1,100 lines across
three languages in three days, most of which I spent deciding what I wanted
rather than writing it. That is the same reason the album art is on there. It
was never going to be worth an afternoon. It was worth a sentence.
Everything is on GitHub at
bobvan/musicKnob — firmware, daemon,
LaunchAgent, and the OpenSCAD case, under a BSD license.
I have written about how my agents are
organized and
what they share. Both of those are about
structure. This one is about the far more mundane question that structure raises
the moment you have more than three of them:
how do you actually sit in front of them?
The answer is one iTerm2 window per team, with a tab per agent inside it —
three windows in total, and I move between them the way you would move between
three projects. That took about twenty lines of shell, and then one very annoying
afternoon.
The grouping is not a filing decision I made for the terminal. It is the same
grouping as the org chart — the four agents that share a codebase come up
together, the seven ops specialists come up together, and the independent ones
come up together. The cockpit ended up mirroring the structure without my
planning it, which in hindsight is the only arrangement that could have worked:
the agents you want on screen at once are the ones that already talk to each
other.
Control mode, which I had ignored for years
tmux has a mode I had always scrolled past in the man page: tmux -CC. Instead
of drawing its own status bar and windows inside your terminal, it hands the
structure to the terminal emulator over a control channel. iTerm2 understands
that channel, and renders each tmux window as a native tab.
So tmux -CC attach gives you real tabs — real ⌘1, ⌘2, real tab bar, real
scrollback — over a session that is still a tmux session, still detachable, still
running on the box when you close the laptop.
That is the whole trick. Everything after this is plumbing.
A launcher per group, not per agent
Each agent already had a one-line script that started it in its own directory.
What I wanted was one script per team: one tmux session, one window per agent,
each running claude in that agent’s own directory.
There are three, and they are the three groups from the earlier posts — the
shared-codebase four, the seven ops specialists, and the independent standalone
agents. Membership is a list at the top of each script, so enrolling a new agent
is adding one line. One of them also mixes in a couple of plain shell windows at
$HOME, which is worth knowing: a launcher’s windows do not all have to be
agents.
The guard that makes re-running safe
The first version rebuilt the session every time. Run it twice and you get a
second claude in every directory, two of them fighting over the same
conversation, plus a duplicate tab per agent.
So every launcher now opens with tmux has-session: if the session is
already up, attach to it and stop. Re-running is idempotent — you land back
where you left off. A fresh argument tears the old session down first and
rebuilds clean.
It is four lines, and it converts a script you have to think before running
into one you can mash blindly.
One switch, two ways to attach
The awkward part is that -CC is a client flag. It only works on attach, so it
cannot be baked into the script that builds the session — and I wanted the same
script to serve both a plain ssh from a terminal and iTerm2’s integration.
One environment variable settles it:
if [[ -n "${TMUX_CC:-}" ]]; then CC="-CC"; else CC=""; fi...exec tmux $CC attach-session -t "$SESSION"
Which makes the iTerm2 profile a single tidy line:
ssh -t user@host "TMUX_CC=1 ~/tmux-up"
Open that profile and I am looking at one team, one tab per agent, on a machine
somewhere else. Swap the launcher path for a different profile and I get a
different team. Drop TMUX_CC=1 and the identical script gives an ordinary
terminal attach.
A cockpit that dies when you shut the laptop is not a cockpit
Plain ssh does not survive sleep. Close the lid, change networks, walk out of
range — the connection drops, the -CC client dies with it, and the tabs vanish.
The tmux session is still running happily on the box, which is the point of tmux,
but you are back at a login prompt and have to go and find it again.
The reflex answer is mosh, which exists precisely for flaky links and
roaming laptops. It does not work here. mosh is a terminal emulator in its own
right — it predicts and re-renders the screen locally, which is what makes it feel
instant over bad links — and control mode is not screen output. It is a protocol
between tmux and iTerm2 that has to arrive intact. mosh has nothing to pass it
through with.
EternalTerminal is the one that fits — and I
did not find it. My buddy Nick Majeran introduced me to it years ago, long before
I had a problem shaped like this one. It sat in the back of my head until the
afternoon ssh kept dropping my tabs, and then it was obvious.
It is a durable transport that reconnects itself across sleep and IP changes, and
it is transparent enough to carry the control channel. The two halves compose cleanly
and the division of labour is worth stating, because it is what makes the whole
arrangement work:
ET keeps the transport alive. tmux keeps the session alive.
Neither one is doing the other’s job. The laptop wakes, ET re-establishes the
connection underneath, and the tmux -CC attach that was already running is
simply still there — so iTerm2 drops back into the same native tabs, with each
agent where you left it.
It survives an overnight sleep. I left it and went to bed rather than
believing the design; the sessions were still there in the morning, tabs intact.
One night is not a season, but it is the test that matters — the failure I was
guarding against happens the first time the lid closes.
The nice part is how little had to change for it. The launchers are
transport-agnostic — they build and attach a tmux session and have no opinion
about how you reached the machine. Only the one line in the iTerm2 profile moved,
and the old ssh form still works as a fallback. It just does not survive
sleep.
et looks like ssh and is not a drop-in
The iTerm2 profile command becomes:
et user@host --command "TMUX_CC=1 ~/tmux-up"
Three things bit me, all because the muscle memory is ssh:
Drop -t. In ssh it forces a PTY. In et it is --tunnel, for port
forwarding, so it misparses. ET always allocates a PTY anyway, so there is
nothing to force.
The remote command is a flag, not a trailing argument.ssh host "cmd"
becomes et host --command "cmd" — there is no positional slot for it.
Give the profile an absolute path to et. iTerm2 runs a profile command
under a reduced launchd environment whose PATH does not include wherever
your package manager installs things. Bare et is simply not found, with a
message that sends you looking in the wrong place entirely. Point the profile
at the full path — whatever your package manager put it at.
And the one that is not a flag at all: ET needs its server half running on
the remote machine. Unlike ssh, which is already there on anything you
would want to connect to, this is a daemon you install and have to make sure
comes back after a reboot.
It does not need root, though, and that is the part worth knowing if you
do not have any. etserver runs perfectly well as an ordinary user, started
by a systemd user service — enable lingering for the account and it comes
back at boot with nobody logged in. On a machine where you are a guest rather
than an owner, that is the difference between this being available to you and
not.
And then the tabs were useless
Here is the part worth reading, because I got it wrong twice.
Every tab was labelled with whatever its agent was currently doing. Not meta
and blog and dns — “Extract agent knowledge to meta directory”, and four
more like it, each one truncated at about thirty characters. Claude rewrites that
string every time its task changes, so the labels also churned while I watched.
A tab bar where every tab says what its agent is thinking about, and none say who
it is, is worse than no tab bar at all.
The same window, before and after one setting. Both bars are correct renderings of a
real tmux field — the bug was never that something was broken, only that iTerm2 was
reading the wrong one.
Wrong fix number one: allow-rename off. The obvious suspect is tmux’s
automatic window renaming, so I turned it off. It worked — the tmux window
name stayed exactly as the launcher had set it. The tabs did not change at all,
because the window name was never what iTerm2 was showing.
Wrong fix number two: iTerm2’s own setting. There is a checkbox, “Applications
may change the title.” Turning it off did nothing either. In control mode the
title does not arrive as an escape sequence for the emulator to interpret — it
comes over the control channel, and sails straight past the setting that governs
the other path.
Two plausible fixes, two hours, no progress. What broke it open was one command:
That prints, for every window, the two fields side by side. The window name was
clean — meta, blog, exactly as assigned. The pane title was the churning task
string. So the bug was not that anything was wrong. Both fields were correct.
iTerm2 was reading the second one.
The actual fix, and the gotcha behind it
In control mode iTerm2 labels a tab from the tmux window title — which tmux
emits only when set-titles is on. tmux’s default is off, so iTerm2 never
received one and fell back to the pane title. Two lines:
set -g set-titles onset -g set-titles-string '#W'
#W is the window name — the one the launcher assigns. Pair it with
allow-rename off and automatic-rename off so nothing later overwrites it, and
the tab bar reads like a staff directory.
You must detach and reattach — a bare detach will not do
iTerm2 reads set-titlesonly when the integration begins. Change it
while attached and nothing happens, which is exactly the feedback you do not
want while hunting a bug of this kind — a correct fix that looks like another
failure.
And ~/.tmux.conf is read at server start, so if the server is still alive
from another session, set it live too:
tmux set -g set-titles on \; set -g set-titles-string '#W'
I lost time to both of these. Between them they make a working fix look like
a fifth idea that also did not work.
The thing worth carrying away
Every wrong turn here shared a shape: I assumed something was broken when
nothing was. The window name was right. The pane title was right. iTerm2 was
faithfully displaying a real field. The defect lived entirely in which of two
correct values was being read — and no amount of staring at either value alone
would ever have shown it.
Printing both fields next to each other took one command and ended the hunt
immediately. That is the general lesson, and it is the same one I keep writing
down about clocks: when
something is confidently wrong, stop interrogating it and get a second reading
beside the first. The disagreement is the information.
The short version
One window per team, not one per agent and not one for everything. The
grouping that works is the one you already have — the agents you want on screen
together are the ones that already talk to each other.
tmux -CC is the whole trick. Control mode hands the window structure to
iTerm2, which renders it as native tabs over a session that is still detachable
and still running when you close the laptop.
Guard the launcher with has-session so re-running attaches instead of
building a second claude in every directory.
Tabs come from the tmux window title, which tmux only emits when
set-titles is on. Without it iTerm2 falls back to the pane title, which
Claude rewrites constantly. set-titles-string '#W', then detach and
reattach — the setting is read only when the integration begins.
ssh does not survive sleep and mosh cannot carry control mode. Use a
transport that can: ET keeps the connection alive, tmux keeps the session
alive, and neither does the other’s job. The launchers do not care which you
used — only the terminal profile changes.
Co-attaching is not merging. Every tab still runs in its own directory, so
the agents’ isolation is exactly what it was.
One last thing, since it looks like the opposite
Sitting a team’s agents in one window makes them look like people in a room.
They are not.
Sharing a tmux session is not sharing anything else. Each tab still runs
claude in that agent’s own directory, so transcripts and memory key exactly as
they did when each was launched alone. The isolation described in
what a Claude army shares is completely
untouched by co-attaching them — this is a cockpit, not a merger.
Which is a distinction I am glad is enforced by where the directories are rather
than by my remembering it, because from where I sit it looks like one
thing.
Last time I sorted a dozen agents into three
groups by how much each one shares — a hive mind at one end, complete
isolation at the other, and a middle group that shares exactly one database.
That map answered how much. It did not answer what, and I have spent the days
since finding out the hard way. Sharing turns out not to be one thing. There
are four kinds in my fleet, they ride separate rails, and every time I have been
sloppy about which is which, I have created a problem I then had to go and undo.
The thing that forced the question
The hive — the four agents that work on one codebase — coordinate through a
day plan: an append-only log they each append to and replay to see where
everything stands. It is a stand-up in writing, for participants who cannot see
each other’s conversations.
It works well enough that I wanted it for the ops team too. Seven agents there,
one each for Proxmox, DNS, NTP, UniFi, the UPSes, Home Bridge and monitoring, and
they routinely tread on each other: a DNS change monitoring ought to expect, a
UPS swap that touches the network gear, an NTP roll somebody should be watching.
The obvious move is to point them at the log the hive already uses. That is the
move I am glad I did not make. It would have worked on day one and been wrong
forever after, because it quietly merges two teams that have no business reading
each other’s plans.
Distinct by construction, not by discipline
So ops got its own. Separate script, separate directory, separate environment
variable — which means an ops agent running the ops tool physically cannot
write the hive’s log. Not “is told not to.” Cannot.
That distinction is the one I keep relearning. Anything enforced by an
instruction is enforced right up until an agent is halfway through a long task,
reasoning hard about something else, and takes the shortest path to a plausible
goal. Anything enforced by construction is enforced always. Given the choice
between writing a rule and removing the possibility, remove the possibility.
Where the log lives is part of the design
The live log sits outside any repository — it is runtime state, and
versioning it would mean a commit every time an agent said “started this.”
The rolled-up history goes into the team’s repo when the day closes.
That way the transient thing stays transient and the durable summary becomes
a durable fact, which is a distinction the two halves of the tool make on
their own so nobody has to remember it.
The best change I made was to how items are named
The hive’s day plan keys each item with an integer stamped from the clock —
I-081901, that sort of thing. Machine-friendly, unique, and I could not hold
one in my head for five minutes.
When several balls are in the air, numbers and names come apart. I would read a
plan, form a picture of what I-081901 was, and by the time I typed a command I
had it confused with I-164853. So the ops version requires a human-friendly
key: AddTwoUps, fix-dns-ptr. Short, unique for the day, and the same string
you type into every later command.
That sounds cosmetic. I do not think it is, and the general form is worth
stating:
The stable key should be the thing a human remembers. The free text is what
you let change.
Most systems I have used get that exactly backwards — an opaque identifier that
never changes and a title that does. Then the title drifts, and the only thing
tying the conversation together is a number nobody can recall. Putting the
memorable string in the immutable slot costs nothing and pays every time somebody
has to talk about the work out loud.
The fourth rail: a library card for the whole fleet
The other new thing is a document cache. My agents keep fetching the same
third-party PDFs — a UPS manual, a receiver’s interface spec, an RFC — and each
one was fetching them separately, into its own context, over and over.
Now there is one local, full-text-searchable corpus that any agent can add to and
search. And it is deliberately the least precious store in the fleet:
It is a cache, not a source of truth. Every document records its source URL
and a SHA-256 of the bytes, so the whole thing is re-fetchable. If I lost it
tomorrow I would type one command and go and make coffee.
It is not versioned, on purpose. Reconstructible things do not need
history. Backing it up is enough.
It is one corpus for the whole fleet, where every other shared thing is
split up by team.
That last point is what made the taxonomy click.
Two questions decide which rail a thing rides
Why must the day plan be per-team when the document cache can be fleet-wide? Two
questions, and they are the whole design:
Is it private, or would it clutter somebody’s thinking? Then isolate it. This
is why memory is per-agent: I do not want the blog agent’s context carrying
opinions about UPS firmware.
Is it specific to one team? Then give each team its own. Coordination is
inherently team-specific — the ops agents’ plan is meaningless to the hive and
vice versa.
A public device manual fails both tests. It is not private, it does not pollute
anybody’s context to have it available rather than loaded, and a datasheet is a
datasheet whoever reads it. So it does not need dividing, and dividing it would
just mean fetching everything twice.
The same map as last time, with the two new rails in it. Note the shape of the
argument: three columns for the things that must be divided, and one band underneath
for the one thing that does not.
The four rails, and what each one is allowed to be
what it holds
how it behaves
Knowledge
distilled facts an agent learned
private by default; pooled only inside a hive
Facts
the inventory — what exists, what version, where
versioned in a repo, one file per thing
State
who is doing what, right now
append-only, replayed; per-team, always
Cache
third-party documents
disposable, reconstructible, fleet-wide
Read down the right-hand column and the rules are all different. One is private,
one is versioned, one is append-only, one is expendable. The failure mode is
putting something on the wrong rail, and it is always quiet: facts in a
coordination log rot silently, coordination state in a repo produces commit noise
nobody reads, and cached documents in version control turn a small repo into a
large one for no benefit at all.
What I would tell someone starting
The first post’s advice was about how much to share. This one is narrower and I
think more useful.
Before you give two agents access to the same thing, ask what kind of thing it
is. If it is knowledge, isolating it is the default and pooling is the
exception you should have to justify. If it is coordination, it belongs to
exactly one team. If it is a fact about your world, version it. And if you could
download it again in a minute, treat it as disposable and stop protecting it.
Then, wherever you can, make the separation structural rather than a rule you
wrote down. A rule is a thing an agent can reason its way around at two in the
morning. A separate directory is not.
Next: A Window Per Agent Team — having sorted
out what the agents share, the far more mundane question of how you sit in front
of them. One iTerm2 window per team, and the tab-title bug that took two wrong
fixes to solve.
I had pushed up my productivity using a single agent, but I was still
bottlenecked. I knew I could get more done if I could bring more than one agent
to bear on my research, but I couldn’t figure out how to keep many agents
marching in the same direction.
I had gone through the progression everybody goes through — chat window, then
the IDE plugin, then the command line, then the command line with a git repo
underneath it, which is the step where an agent stops being a clever autocomplete
and starts being something you can hand a project to.
Each step was a real improvement. But they all landed in the same place: one
conversation, one task, and me sitting there while it thought. I had four or five
things I wanted done and exactly one worker.
What I was actually trying to run
Some context, because the shape of the work drove everything that follows.
I run a homelab of about ten Proxmox VMs and containers with high-availability
migration between nodes. Alongside it is a timelab — more than half a dozen
embedded Linux boxes, mostly Raspberry Pi class, doing precision timing work. At
any given moment that lab usually has three or four different data-collection
experiments running at once.
I needed agents for Python coding, for code reviews, for coordinating access to
shared lab resources, for research, for design, for graphical presentation of experimental
results, and for monitoring/restarting experiments while I was away from the lab or sleeping.
That is the load. It is not one project that needs an assistant. It is a small
institution that needs staff.
The framework I couldn’t drive
Early in 2026 my friend Matthew Mahowald suggested I look at
Gas Town, a multi-agent workspace
manager, and I did. It has a whole vocabulary — a Mayor who coordinates, a
Town that holds your projects, worker agents with persistent identity, work
tracked in a git-backed ledger. Conceptually it was exactly what I
was after.
And when I told the Mayor to write code, I loved the result. That part was
good.
The trouble started when the Mayor delegated. Work handed off to another
agent came back incorrect, or did not come back at all, and I could not see
enough of what was happening to work out why. In retrospect I suspect I was meant
to be working directly with those agents rather than through the Mayor — but I
never figured out how to structure my project so that I could.
So I did the thing you do when a system is too complicated to drive: I stopped
driving it. I went back to giving the Mayor the work directly and waiting for it,
which is precisely the bottleneck I had set out to escape, now with more moving
parts.
In fairness to Gas Town
It was very new when I tried it, and I probably could have worked harder to
whip it into the shape I needed. A tool being wrong for me in early 2026 is not
the same as a tool being wrong. I am describing why I left, not making a
recommendation about where you should land.
The three habits I took with me
I did not leave empty-handed. Three things came out of that experiment and I
still use every one of them.
tmux, and the episodic check-in
Not as a terminal multiplexer — as a way to hold several agent sessions and
switch between them in a keystroke.
The reason that matters is that my prompts are not quick. I got curious enough to
measure it: I pulled the timestamps out of every session transcript across the
whole fleet and timed each prompt to the moment the agent went idle.
Every prompt I have given the fleet, timed from the transcripts. The median is three
minutes, which sounds watchable. The tail is the argument: one prompt in ten runs past a
quarter of an hour, one in twenty past twenty-eight minutes, and the longest ran most of a
working day.
A three-minute median sounds like something you could sit and watch. The tail
says otherwise, and the tail is where the interesting work is.
It gets better, because a prompt returning quickly often does not mean the work
is done. Half the time the agent has just started an experiment in the
timelab, and what I actually want is to come back later, look at the data
collected so far, and decide whether to let it run or change the parameters.
And you cannot predict it from the prompt either
I assumed a long prompt meant a long wait. It seemed obvious — more asked for,
more work done. So I measured that too, and it is not true. Across all 1,071
prompts the rank correlation between how many words I typed and how long the
agent then ran is 0.12, which is another way of writing “none”. Bucket the
prompts by length and the median duration barely moves: about three minutes for
a five-word prompt and about three minutes for a three-hundred-word one.
Which lands somewhere more useful than where I started. I cannot look at what
I just typed and estimate when to come back. The information simply is not in
the prompt.
So the unit of interaction is not “ask, wait, read.” It is check in,
correct, leave again — and tmux is what makes that cost nothing. The same sessions I
have at my office desk are on an iPad Pro with a keyboard on a park bench, or on
my iPhone with a folding keyboard I have carried on the bike to a picnic table.
I get a status update and make a mid-course correction whenever I have a moment,
from wherever I happen to be.
--dangerously-skip-permissions
The flag does what it says. Every approval prompt goes away and the agent just
acts.
I understand why that alarms people, so let me say plainly how I think about it.
The prompts were not making me safe. I was approving them the way everyone
approves them — reflexively, in batches, without really reading. What they were
doing was serializing the work: the agent stops, I context-switch back, I click,
it resumes. That is the bottleneck again, wearing a safety control’s uniform.
So I moved the safety somewhere it could actually do some good.
Use git worktrees when agents share a repo
The third habit. When several agents are working on one project, give each its
own git worktree — separate directories, separate checkouts, one shared history.
They can work on different aspects of the same problem without tripping over each
other’s files, and everything still converges through git.
At this point in the story that was just tidiness. It turned out to decide far
more than I realised, for reasons I would not understand for months.
Where they live, and what I assume about them
The whole fleet runs inside a single unprivileged LXC container on the Proxmox
cluster. Inside that container the agents are ordinary users — no passwordless
sudo, nothing special. What they do have is real authority outward:
passwordless sudo on the timelab machines they run experiments on, and whatever
other credentials I have handed them, scoped to specific jobs.
My default security posture assumes that malicious intent will show up eventually,
even on a nominally trusted network. I do not get to assume my own LANs stay
friendly forever. So I treat the container running my agents as a potentially malicious
actor and ask two questions about it: what could go wrong if code in there went
rogue, and how would I recover? This posture explains why it’s an unprivileged
container.
Those questions have good answers here. The container itself I can snapshot, roll
back, or throw away, on a cluster that can move it between nodes. The lab
machines it can reach are experiment boxes I can reimage in an afternoon. That is
the trade — the agents are fast and trusted within limits I have actually drawn,
instead of being interrupted forty times a day by prompts that were never a
boundary at all.
This is a homelab posture. The damage is limited to my own equipment and my
own time. If the same fleet were touching production systems belonging to
somebody else, the arithmetic would be different and I would not be writing this
paragraph so cheerfully.
The day plan
With tmux, worktrees and no approval prompts, I got to four sessions running in
parallel. And immediately hit the next problem, which is the interesting one:
four agents working on related things have no way to talk to each other.
They cannot see each other’s conversations. They cannot ask each other questions.
Two of them will happily solve the same problem twice, or worse, solve it two
incompatible ways.
What I built for this is embarrassingly simple. It is a file. I call it the day
plan, and it is an append-only log every agent can write to and read back. An
agent can propose an item and get an ID, ack somebody else’s, discuss
under one in a thread, set a status, or render the whole current state as
markdown. Current state is computed by replaying the log, so several agents can
write at once without stepping on each other. No database, no server — a JSONL
file and a script.
Why append-only turned out to matter
My first instinct was a shared markdown file the agents would edit. That fails
immediately and in the most annoying way: two agents read it, both edit, the
second write silently erases the first, and neither of them knows.
Append-only fixes it at the storage layer instead of asking everyone to be
careful. Nobody edits; everybody appends; the current picture is derived.
The rhythm that grew around it is my favourite part of all this. I would wake up
having slept on the previous day’s work with new tasks in mind — usually with
some dependency between them that we would refine as the day went on. The day
plan is where I put those, and where the agents put their results, their requests
of each other, and their proposed follow-ups.
It reads like a stand-up that happens in writing, all day, without anybody
standing up. The four sessions on my main project have names — Main, Bravo,
Charlie and Delta — and they address each other by them, which sounds twee until
you are reading a threaded argument between two of them about whose number is
right.
Those four are the first of three different ways I ended up organizing
agents, and it is the one that shares the most: one repo, one pool of retained
knowledge, one day plan. A hive mind — everything shared. I did not choose it
so much as fall into it, and it would be months before I understood why it worked.
The first sign that I did not understand my own setup
One day Charlie started talking about itself in the third person.
It took me a moment to work out what I was reading, and then it clicked: Charlie
had taken on Bravo’s persona. I now had two Bravos and no Charlie at all. Getting
one of them to pick up as Charlie again was easy enough — I told it who it was
and it carried on. At the time I did not give it much thought beyond
laughing and imagining a B-grade movie: Invasion of the Context Snatchers.
It was the first sign that I did not really understand what my agents shared and
what they kept separate. I filed it as a curiosity. It was actually a symptom,
and it would be months before I knew of what.
Retained knowledge, and how I stumbled into it
Here is the part I got to backwards.
What I wanted, without yet having the words for it, was retained knowledge:
every new session for a given agent should start with a distillation of the
previous work, so I never have to re-explain the project. And — just as
important — I did not want every agent to know everything, because knowing
everything is just a way of wasting context.
Those first four agents were each in a separate worktree of one shared repo,
working on different aspects of the same project. They shared everything except
their transcripts. Entirely by accident, I had stumbled into exactly the retained
knowledge configuration you want for that shape of work: a hive mind — common
facts pooled, conversations separate.
Then I started spinning up agents for completely unrelated purposes — Proxmox,
UniFi, DNS, Homebridge, Checkmk, the UPS fleet, this blog, and others. And the
accident stopped being lucky. I did not want to clutter my Proxmox agent’s
context with conversations about writing blog posts.
Those turned out to need the other two organizations. The ops agents each tend a
different system, so they want private heads — but they all need the same facts
about which host is which, so they are independent, with one shared database.
And a handful of agents have nothing whatever to do with each other and should
never bleed together: fully independent, nothing shared.
Three organizations, sorted by how much each group shares. But I only got there
after finding out how sharing worked at all.
That is what finally drove me to understand how retained knowledge is shared
between agents, and how it is not.
The hiring analogy
The way I think about it is hiring.
Say you run a ten-person company and everyone is working at 90% capacity. On
paper you have one person’s worth of slack you could use to start a new project
if you distributed it across the team. But you probably should not. Handing a new
direction to ten busy people costs each of them a context switch, and what you get
back is worse than one focused person’s work. Hire the eleventh.
That is exactly the trade with agents, except the eleventh employee starts
immediately and costs a great deal less. Not nothing — every agent burns tokens,
and more of them means more output to review, which is the scarce resource in the
end. But the argument was never about cost. It is about context switching, and
that is the thing the eleventh employee actually saves you.
What the meta agent found
So I pointed an agent at the fleet itself — a meta agent whose whole job is how
the other agents are set up. The meta agent explained how three things are keyed
independently:
what
where it lives
keyed by
the conversation transcript
on disk, per project
the directory you launched from
the instructions
CLAUDE.md in the project, plus a global one
the project directory
the distilled memories
a memory store per project
the git repo, if there is one
Which yields one rule that does most of the work:
Launch each agent from its own directory and it gets a separate transcript,
separate instructions, and separate retained knowledge for free. No access
control needed. The isolation is a side effect of where you started.
And it explained my accident. Main, Bravo, Charlie and Delta shared a repo, so
they shared one memory store — which is why they had felt so well coordinated.
Two directories that share a git repo share their retained knowledge no matter
how separate they look.
It also explained why the day plan worked as well as it did. A shared log of
proposals and acks is only useful between agents who already have the same
picture of the project; four strangers passing notes would have spent every
message re-establishing context. The day plan was an extra layer of
coordination on top of shared retained knowledge, and it was only possible
because that layer was there. I had built the visible half and inherited the
invisible half by accident.
It also explains what an agent is. Identity comes from the launch directory —
which means Charlie was never a thing that could be corrupted, only a directory I
could start something in. I never did find out exactly what happened that day,
when Charlie seemed to snatch Bravo’s identity, and I no longer have the evidence
to check. But I am certain that agent identities can be mixed up if you are not
careful, and that I should have chased down the confusion at the time.
The setup now includes a tmux startup script per agent that launches it
from the correct directory, every time. It is a nine-line shell script guarding
the single decision that determines who an agent is, and writing it down was
the cheapest fix in this entire story.
Then the meta agent found the thing I would never have found myself: a
vestigial ~/.git left over from that earlier experiment with Gas Town. My
home directory had quietly become a git repository, so every agent underneath it
that was not inside another nested git repo — Proxmox, DNS, the blog, all of
them — was pooling its memories into one store and reading everybody else’s
retained knowledge. I had been carefully separating agents into their own
directories and inadvertently running a global hive mind the whole time.
Archiving that stray .git fixed it, and we then walked through the rest
deliberately: isolate retained knowledge where isolation is what you want, and
share it where sharing is what you want.
The three organizations, on one page
Which is where the three ways of organizing agents stop being scattered
observations and become a shape. The meta agent drew the whole fleet as a single
map, and it is the clearest picture of this I have.
One fleet, three organizations, sorted by how much each group shares — a hive that
shares everything, independents that share one database, and agents that share nothing.
The badges are a second and independent dimension: how far each agent can reach.
1 Hive mind — everything shared. Main, Bravo, Charlie and Delta. Four
worktrees of one repo, so one memory store, one set of docs, one day plan. They
know everything each other knows, which is what makes a threaded argument between
two of them productive rather than a re-briefing.
2 Independent — one shared database. The seven ops agents. Each keeps private
lessons in its own store, because how the Checkmk agent likes to work is no
business of the DNS agent’s. But they all read and write one shared repository of
host facts, because facts about the homelab belong to the homelab. The trick is
that they reference that repo rather than launching from it — so it never
becomes their memory keying.
3 Fully independent — nothing shared. The meta agent, this blog, and one
more. Different domains that should never bleed into one another.
There is a second dimension on that map, drawn as a badge above each agent, and
it is worth reading separately: reach. How far into the real world that agent
can act. Those two axes are independent, and confusing them is the mistake the
map exists to prevent — the ops group is the most isolated in knowledge and
contains some of the widest authority, while the blog agent is isolated on both
axes and still carries the fleet’s only real risk, because its output is public —
this post, and everything in
Topics In Timekeeping, came out of it.
Sharing and power are different questions.
Isolated context is not isolated access
Even with contexts properly separated, all these agents run on the same VM as
the same user and can read the same files. That turns out to be a feature.
When work with the Proxmox agent produces something that might interest people
outside my homelab, I can simply ask the blog agent to go and read what the
Proxmox agent did.
Separate heads, shared filesystem. The isolation is about what clutters whose
context, not about building walls.
Where everything lives
The meta agent also worked out what actually goes where, and this is the part I
would hand to somebody starting today.
CLAUDE.md auto-loads every session, so it holds the project’s identity, its
conventions, its working rules, and pointers to everything else. It is the
single biggest lever against re-explaining yourself.
glossary.md holds the lingo — human-facing, browsable, the place where the
project’s jargon gets defined once. That one is my buddy Chris Treichel’s
idea, and it has earned its keep several times over. A glossary keeps the
language consistent across sessions and consistent with what is written in
docs/, which matters more than it sounds like.
In my last talk I put it as sloppy language is sloppy thinking. A glossary
keeps the thinking honest, and it cuts down the confusion between the language
model and the meat-ware — which is very often not a disagreement about the
subject at all, but two parties using one word for two things.
The memory store holds distilled agent-facing facts, one per file, indexed so
a fresh session can find them.
And the rule that ties it together, which my main project now follows: every new
file in docs/ gets summarised into CLAUDE.md with a link back to the file for
the details. So every session begins with a summary of all the retained
knowledge that exists, plus pointers to the depth. The agent reads a page and
knows what it knows; it goes and reads the file only when it needs the detail.
That is what makes a brand-new session caught up rather than just resumed —
which matters more than it sounds like, because resuming an old session replays
the entire transcript into context, and transcripts grow without bound.
The comfort that hid the problem
Here is the mild scar tissue. tmux gave me session continuity, those sessions
ran on high-availability servers, and the whole thing sat behind a UPS. Nothing
ever went away.
Which meant I never had to think about where state was stored — until I
started actively trying to separate agent contexts and discovered I did not
know. The infrastructure was good enough to hide the question for months.
Uptime is a wonderful thing and it is a poor teacher.
What I’d tell someone starting
Steal the tmux habit first. It is free and it changes the economics of
watching more than one thing. Check in episodically; do not sit and watch.
Give each agent its own directory, and know what that keys. Transcript and
instructions follow the directory. Retained knowledge follows the repo. That
difference is the whole ballgame and it is easy to get wrong by accident. Write
the launcher script that starts each agent in the right place — the one decision
you cannot afford to make by hand at eleven at night is which agent you are
talking to.
Build the shared file before you think you need it, and make it append-only.
The moment you have two agents on related work you have a coordination problem,
and you will invent something worse under time pressure than what you would
design calmly.
Partition by domain, not by capacity. The temptation is to give new work to
whichever agent seems least busy. Resist it. Hire the eleventh.
And pick your boundary deliberately. Somewhere between “approve every file
write” and “no limits at all” there is a line that fits what you are actually
risking. Mine is the edge of a container I can roll back, chosen on the
assumption that something hostile turns up eventually. Yours might be somewhere
else entirely — but it should be a decision you made once, not a prompt you
dismiss forty times a day.
Follow-ups: What a Claude Army Shares — the
flip side of this map. Sorting the groups by how much they share raised the
question of what kinds of thing get shared, and the answer turned out to be
four separate rails with four different sets of rules. And
A Window Per Agent Team — the cockpit rather
than the structure: how you actually sit in front of all this.
I gave this talk again today,
on the Time Appliances Project
call — a month after the first outing at NPL, and to a room full of the people
who actually run datacenter time for a living. Same argument, same parts list,
same clock. Four more slides.
What is interesting is where those four came from. I spent the month between the
two versions writing Topics In Timekeeping — thirty pages on
the material the talk has to skate over — and the new slides are almost entirely
things I only understood well enough to draw because I had to write them down
properly first.
I must credit my friend
Prof David Lariviere for his critical review
of the London NPL presentation. His pointed questions steered the content I
created for the timekeeping pages and the additions to the presentation.
Explaining it to David 1:1 turned out to be a better way to find the holes than
explaining it to a room. A room is polite about the parts you hand-wave.
What is new
Three pictures of the same satellite, in order of how wrong they are. The
intuitive model has master clocks in orbit. The next one has the ground steering
them. The real one has the satellites free-running while the ground computes
corrections and the satellite relays them — and your receiver does the
arithmetic. That progression is the spine of
what limits GNSS time accuracy
and I could not have drawn it cleanly before writing that page.
What a correction stream actually buys. Leaving the broadcast navigation
message for a real-time stream is a factor of 25 in error and a factor of 100
in freshness, in one step. Two numbers on a slide that used to be a paragraph
of arm-waving.
A very expensive thermometer. Eight minutes of quantization error from a
u-blox F9T while my lab warmed and cooled — probably a ceiling fan on a warm
afternoon. The sawtooth sweeps one way, slows, stops, and reverses. Unwrapped,
the oscillator’s phase walked out to 120 ns and came back. When you compare
GPS time to quartz time, you have built a thermometer. That slide is now the
evidence on
how GNSS holdover works,
because in holdover nothing is watching that happen.
A trading campus that agrees with itself much better than it agrees with
UTC. Any pair of ports across a half-mile Equinix campus in Secaucus syncs to
200 ps, while the same equipment holds only ±15 ns RMS to UTC. That is a
factor of seventy-five, it is the normal state of affairs, and for most of what
those machines compute it is the right trade — which is the whole of
agreement versus accuracy.
And one honest new result
The clock reaches sub-nanosecond stability and still only manages 3 ns of
agreement between clocks.
Those are not in tension, they are the two different ways of being wrong that
this subject keeps insisting on. Stability says the output is quiet. Agreement
says two of them land in the same place. The carrier-phase measurement underneath
is doing extraordinarily well — 37 to 109 ps of per-epoch precision, which is the
number I keep pointing at — and the gap between that and 3 ns is the work that
remains.
Saying so on a slide is more useful than saying “sub-nanosecond” and stopping.
The last slide is a QR code
The talk now ends by pointing at
Datacenter GNSS Time Best Practices,
which is the closing slide of my previous talk unpacked into a page that has
room for the reasoning. Eight practices, most of which cost nothing but
attention.
That is the shape this has settled into: the talks raise the questions, and the
pages are where the answers get written down and corrected.
The slides, and the recording
Watch the talk — the Time
Appliances Project published the whole call, and this is the v4 deck with the
narration that carries it.
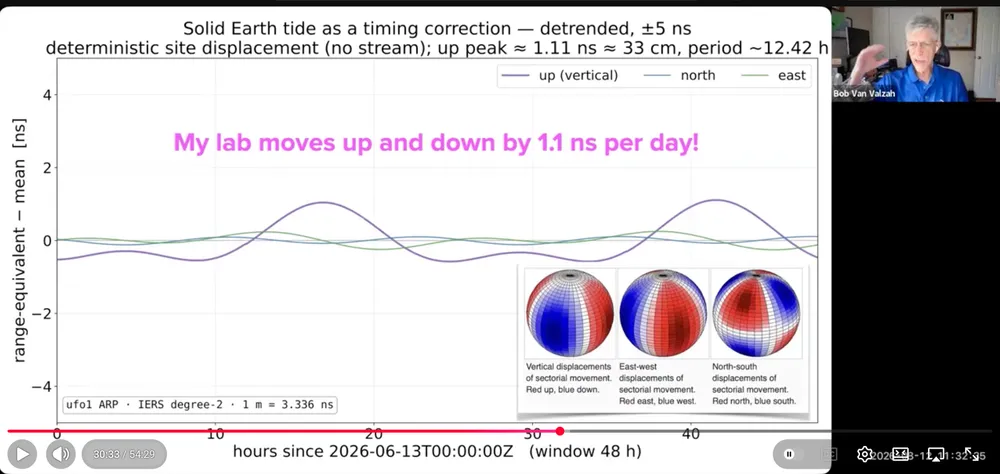
Thirty minutes in, on the slide I did not expect to be arguing about: the
solid Earth tide moves my lab up and down by about 33 cm, which is
1.1 ns of range twice a day, and it is deterministic enough
to correct for. Click through for the whole 54 minutes.
There is also a
dress rehearsal recording
of the July version, kept for the record — it predates the four slides above,
and everything else in it stands.
As always the slides are heavy on visuals and light on bullets, so the PDF leaves
out what the narration carried. Increasingly, though, what the narration carried
is written down properly next door.
Two talks in, I kept running into the same problem.
A presentation is a line. You get an hour, you pick a path through the material,
and everything off that path gets a wave of the hand — that’s a whole other
talk — and then it never is. The questions afterwards were always about the
things I had waved at.
Thirty pages on getting precise time into a datacenter and knowing whether you
actually have it. It is deliberately not a series of blog posts.
Posts are dated. They are a record of what I thought in a particular week, and
the honest thing to do with an old one is leave it alone. These pages are the
opposite: they have no publication date, they carry an updated date, and I
intend to keep them correct. When I learn something that contradicts one, I will
change the page rather than write a new post explaining that the old one was
wrong.
That is a promise about maintenance, not about being right the first time. Early
drafts of several of these pages carried arguments I withdrew once I checked them
properly — including one that was refuted by the very table I had cited in its
support.
The numbers
pages
30, in six sections
words
about 42,000
glossary entries
32
figures
19 — 10 drawn for the site, 9 from my talks
links between pages
143
outside sources cited
22
Eleven days from the first page to this one.
The six sections
Asking the Right Questions — what to ask a
vendor before you buy a clock, and what to ask yourself before you benchmark one.
Nine questions whose answers tell you whether the person selling understands
what they are selling.
Timekeeping in Datacenters — the practical
core. How to get time into a building, what makes a receiver accurate, what to
type in for your antenna position and feedline, how holdover actually works, and
eight best practices that mostly cost nothing but attention.
GNSS — what limits GNSS time accuracy, which
constellation keeps the best time, and which correction stream you actually need.
The short version: GNSS time is a prediction, and that single fact sets every
limit.
What Is UTC — whether you can sync to UTC at all
(literally no, practically yes), who defines it, what “traceable to UTC” really
requires, and whether you could build your own link to UTC(NIST). We tried. The
answer is more interesting than yes or no.
Measuring Time — the metrology underneath all
of it. Timestamps and timescales, precision versus trueness, why averaging stops
helping, why resolution can counterfeit precision, and how you would know your
clock was still right.
Time Distribution — NTP, NTS, PTP, White
Rabbit and a bare PPS, compared on the two things that decide which you need, and
why acquiring time well and distributing it badly wastes the money you spent on
the first part.
There is also a glossary, because half of this
subject is people using the same word for different things.
Almost every failure in this field is quiet. A wrong antenna
position, an uncompensated cable, a receiver surveying itself badly, a clock
drifting after its reference vanished — none of them raise an alarm, none
degrade a status light, and all of them produce a confident, steady, wrong
answer.
Which is why so many of these pages end up in the same place: the number you
can defend is the one you checked against something independent, and wrote
down.
It will change
It is a garden, not a stream. Pages will be revised, split, retitled and
occasionally deleted. There is
an RSS feed if you want to hear about that.
Several pages carry measurements I have not finished making, and I have tried to
be explicit about which numbers are mine, which are somebody else’s, and which
are modelled rather than measured. If you spot something wrong, I want to know —
the About page says how to reach me, and getting it right matters to
me more than having said it first.
A storm took my power out for thirty-one hours.
The interesting part was over in fourteen minutes.
That is how long the UPS lasted — one UPS, carrying everything.
When it quit, all of it went at once: the cluster, the switching, the access points, the gateway.
Fourteen minutes was a great deal less than I had expected, and being that wrong about a number I thought I knew is what sent me looking.
I had thirty-one hours to look.
What a Car Battery Taught Me
Somewhere in the dark I wired up a car battery and an inverter.
The first thing that turned up was that both ISPs were still up.
Whatever the storm had done, it had not touched their side of the demarc.
The Internet had been there the whole time, sitting a few feet from equipment with nothing to run it.
So I fed the modems and my Internet gateway off the improvised supply and brought the path back.
The gateway carries a small PoE budget of its own, and that was enough to light one access point — so the WiFi came back too, off a car battery, out of a single box.
And my battery-powered WiFi devices still could not get online.
That sentence is the reason this post exists.
I had restored the Internet — carriers, modems, gateway, the entire path — and the devices that wanted it were sitting there with hours of charge in them, and nothing worked.
Without meaning to, I had built the obvious fix and watched it fail.
A car battery and an inverter are a crude second power source for the Internet gear, which is exactly the upgrade I would otherwise have bought, installed, and felt clever about.
On its own it does nothing.
The Dependency With No Fallback
What I had actually found was that nothing in the home could turn a name into an address.
My DNS servers do two jobs at once.
They are authoritative for the internal view of my domain — I run split-horizon DNS, so they answer with internal addresses unknown to public DNS servers.
They are also the recursive resolvers for every name outside my domain.
That combination is not a mistake. It is what split-horizon costs.
A client is configured with a list of DNS resolvers and uses them for all queries; there is no way to tell a phone to ask one resolver about my domain and a different one about everything else.
Choose split-horizon and you have chosen one set of servers that must answer every question every device asks.
Which also means there is no fallback, by construction.
I cannot hand clients a public resolver as a backup, because a public resolver does not know my names — it would answer the public questions and break the private ones.
None of that is the error. The error was failing to follow it through, in two directions I had never looked.
I had never noticed that my Internet connectivity depended on my cluster.
The ISPs, the gateway, the WiFi — those are the things you would list if someone asked what your Internet depends on, and that night all three of them were working.
A device with a perfect path to the Internet and nothing to resolve names with is simply offline, and no amount of health in the rest of the chain rescues it.
And I had never compared the relative power costs.
Keeping the Internet and the WiFi alive is a matter of tens of watts — a gateway and an access point, exactly as the car battery demonstrated.
Keeping my DNS answers alive meant keeping a three-node Proxmox cluster alive, with its ECC memory and its mirrored storage, which is a different order of magnitude altogether.
In terms of power used, I had made the cheapest part of my network depend on the most expensive part, and I had never once put those two numbers beside each other.
The three resolvers were real redundancy, and all of the same kind: three containers on one cluster, which is to say three copies of one dependency in one power domain.
Spreading copies across nodes protects you from losing a node. It does nothing about anything all the nodes share.
Follow the dependency, then price it
A gateway on its own UPS gives you a working path to the Internet and no way to use it — path
intact, unusable. So follow the chain past the obvious links: whatever your clients cannot
function without has to move to the surviving tier too, and for most networks that list starts
with name resolution.
Then price what you found. A cheap dependency chained to an expensive one inherits the expensive
one’s runtime, and that is where the surprise usually hides.
Two Networks, and Only One of Them Matters at 2 a.m.
The car battery had drawn the line for me without my noticing.
What I had chosen to power off it at two in the morning was not a random subset of my equipment — it was a category, and everything I had left dark was the other one.
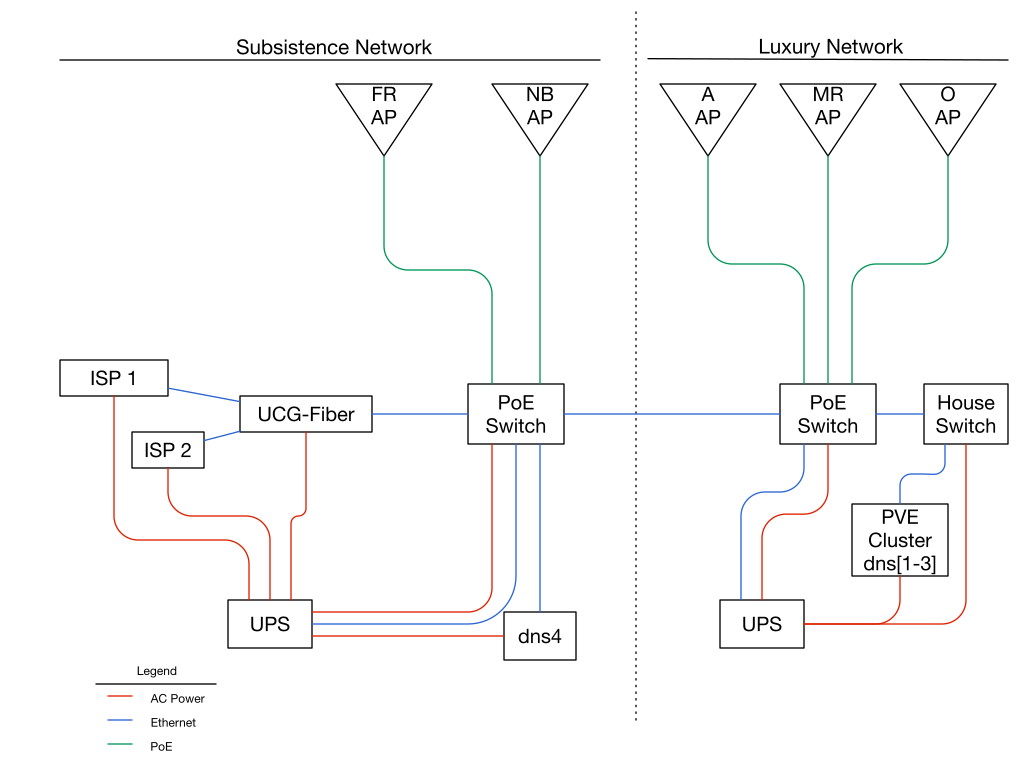
Sketching it out afterward, the gear sorted itself so cleanly that I felt slow for not having seen it before:
The subsistence network — the minimum required to stay connected.
The ISP handoffs, the gateway, one small PoE switch, a couple of access points, and a resolver.
The luxury network — everything else.
The cluster and its guests, the fast access points, the big switches, file service, cameras, the DVR.
The layout after the rebuild. The dotted line is the one that matters: everything left of it
has to survive on its own, so the AC power, the Ethernet and the PoE all stop at that line
too. Only the blue Ethernet link crosses it — and when the luxury side goes dark, losing that
link costs the subsistence side nothing.
The network names are the useful part.
Once you have them, the placement question asks itself: during an outage, is this thing subsistence or luxury?
DNS resolution is obviously subsistence. It had been sitting in the luxury tier for years.
Separating the Networks Meant Separating the UPSes
Before the storm there were no tiers, just outlets.
One UPS carried the whole load — cluster, switching, access points, gateway, all of it sharing a single battery and therefore a single runtime, set by the heaviest thing plugged into it.
That is the part that could not be fixed by rearranging anything.
As long as the subsistence gear draws from the same battery as the cluster, it inherits the cluster’s runtime, and the cluster is where the watts are.
Sorting the network into two roles only becomes real when the two roles stop sharing a battery.
So the split had to be physical: a second UPS, carrying nothing but the subsistence network.
A permanent, better-behaved version of the car battery on the floor — but wired to a new resolver as well as to the gateway, which is the part the car battery taught me it needed.
Pulling a little load off the luxury UPS buys the luxury network slightly longer runtime, which is a nice fringe benefit.
The important benefit is the other direction: the subsistence network, alone on its own battery with a small load, now runs for hours instead of minutes.
Power and Network Paths Have to Agree
This is the point I would keep if I could keep only one.
A UPS gives a device power. It does not give it a path.
The subsistence tier is not a set of devices — it is a set of devices plus every hop between them, and all of it has to be on the right side of the line.
Three kinds of wire had to be checked, and they are easy to check separately and get wrong together:
AC power. The obvious one, and the only one most people trace.
Ethernet. A device on the subsistence UPS whose uplink switch is on the luxury UPS is a luxury device wearing a disguise. It keeps running and stops being reachable.
PoE. The one that hides, because the power and the network arrive on the same cable from the same box. An access point is only as protected as the switch port feeding it — which means an AP is on whichever tier its switch is on, no matter which room it lives in.
That last one nearly caught me. Splitting access points across tiers is not a matter of choosing which APs matter; it is a matter of which switch each one plugs into, and that switch’s power decides for you.
The diagram above is really just this rule drawn out: red, blue and green all stop at the dotted line together.
The one crossing is a single Ethernet link between the two switches, and it is deliberately the only thing that dies at the boundary.
Trace all three, on the actual cables
Follow AC, Ethernet and PoE separately, hop by hop, and assume nothing about where a wire goes
because of where it ought to go.
I found one link that would have made the whole rebuild theatre — the subsistence switch appeared
to chain through the luxury spine, which would have left the survivors running perfectly and
talking to nobody.
It turned out not to, but I learned that by tracing cable, not by remembering.
The Subsistence Tier Is a Watt Budget
That comparison I had never made — the relative power cost of each half of the network — is not a footnote to the design. It is the design.
The subsistence tier is not “the important gear.” It is “the gear that fits in the watt budget.”
Every watt on that tier is minutes off the runtime, so the question stops being what do I want during an outage and becomes what can I afford to keep powered.
Those are very different questions, and the second one has much shorter answers.
My access points make it concrete. They are the same brand, a generation apart:
Older APs
Newer APs
Model
U6 Lite
U7 Pro XG
Max power
12 W
22 W
Power method
plain PoE
PoE+
Uplink
1 GbE
10 GbE
The newer ones are better and earn their place on mains power.
They are also nearly twice the draw, they demand more from the switch, and they run hot enough that you notice when you touch one.
Fine habits. Expensive ones on battery.
So the older pair are the subsistence APs.
They cover the home at twelve watts apiece, and the fast hot ones are allowed to go dark.
On the subsistence tier, good enough everywhere beats excellent nearby.
The same contrast, and more starkly, in the two boxes each network hangs off:
Subsistence gateway
Luxury switch
Model
UCG-Fiber
USW Pro XG 8 PoE
Max power
29.4 W excluding PoE
61 W excluding PoE, 210 W including
PoE budget
30 W
155 W
The device that roots the entire subsistence network is rated below thirty watts.
The single switch at the head of the luxury network is rated for two hundred and ten, before you count anything hanging off it.
That gap, repeated in miniature across every device on each side of the line, is why the subsistence UPS now runs for hours where the old shared one ran for fourteen minutes.
It is not a better battery. It is a much smaller ask.
Look at the PoE row, though, because that is the one that surprised me.
Thirty watts is not much of a budget — and it is comfortably more than a twelve-watt access point needs.
That is the whole reason the WiFi came back on the car battery: I powered one box, and one box quietly powered the access point behind it.
The subsistence network was always small enough to fit inside its own gateway. I had just never had a reason to notice.
The Survivor
The fix is the box labeled dns4 in the diagram, and it is a Raspberry Pi.
Not another cluster node. A bare Pi running BIND, doing both of the jobs above: a caching recursive resolver and an authoritative secondary of the internal zones.
It has to be both, for the same reason the originals are: split-horizon leaves the client no way to split the question, so a survivor that answers only half of them strands it just as completely.
Full root recursion, no forwarder, nothing upstream with an opinion about my queries.
The zone copies persist to disk with a 28-day expiry, so it keeps answering authoritatively for about four weeks after the primary disappears.
That is longer than any outage I intend to have.
Three choices in there were deliberate:
Same software as the others. BIND, with the same configuration idioms, because a survivor you administer differently is a survivor you will misconfigure.
Bare metal, not a container. The entire point is to not be on the cluster.
Not highly available. Making the survivor HA would put it straight back onto the tier I am trying to escape.
It is also stripped down to almost nothing — no desktop, no print service, no mDNS, no RPC — until the only things listening are DNS and SSH.
A survivor should be small.
Every service it runs is one more way for it to not be there when you need it.
And a spare nobody is told about is not a spare
There was a second, dumber problem, and on its own it would have quietly defeated everything above.
DHCP was handing out exactly one resolver.
So even if one of the three had somehow survived, no client would have thought to ask it.
My name service was one deep on the wire no matter how many copies were running.
DHCP now hands out all four, with the Pi last.
Clients prefer the cluster and fall through to the survivor only when the cluster is gone.
The cost is a few resolver timeouts during a total outage, which is exactly the right trade.
What Else Was Riding on the Wrong Tier
Two more things turned out to be the same mistake wearing different hats, and finding them is what convinced me the tier idea was worth the rewiring.
Nothing was ever told to shut down. The UPS knew perfectly well that it was on battery and running out.
No server knew, because nothing was wired to tell them.
The nodes were not shut down at fourteen minutes; they were cut off.
That is a worse outcome than a clean shutdown and it was free to fix.
The shutdown notification now runs on dns4, on the subsistence tier — because a process that warns machines about a power failure is worthless if it is on the power that failed.
The monitoring was a guest of the thing it monitors. Checkmk runs in a container on the cluster, so at fourteen minutes I lost the monitoring at the same moment I lost the thing worth monitoring, and had to reconstruct the outage timeline afterward from a log that simply stopped.
That one I did not move, and the reasoning is worth stating because it cuts against the tidy version of this post.
Checkmk is heavy. Putting it on the subsistence tier would spend watts — and therefore runtime — on something that is not required to keep the home connected.
So it stays a luxury service, and it stays a guest of what it monitors.
What moved instead is the small, urgent job: the shutdown notification, which has to survive, and now does.
Split the alarm from the dashboard
The job that must survive an outage is small — notice the power failed, tell the machines to stop.
The job that helps you understand it afterward is large.
Put the small one on the tier that lives and let the large one die with everything else.
Trying to keep your whole observability stack alive on battery is how the watt budget gets spent
on the wrong thing.
Three Questions Worth Asking About Your Own Setup
Which UPS feeds which machine, and which switch feeds which UPS?
I could not answer either when the power came back.
Answering them took two evenings with a flashlight and changed the design twice.
Until that map exists, no post-mortem you write can say what should have stayed up.
Does anything your clients cannot function without live only on the tier that dies first?
Name resolution, certainly — especially if a split-horizon setup means there is no public fallback.
Then think about what else: a password manager that syncs, a door lock controller, the thing that tells you the power is out.
Are clients actually told about the survivor?
A survivor nobody queries is decoration.
The batteries will still run out. That was never the part worth fixing.
What changed is the order things go dark in, and how long the home can keep answering its own questions on the way down.
My earlier talk asked whether sub-nanosecond
GNSS clock sync was even possible. This one is about building it.
I gave it on 9 July 2026 at the
STAC Summit held at the
National Physical Laboratory in Teddington — which is a
slightly intimidating room in which to discuss timekeeping.
The dress rehearsal, which is also the recording linked below.
GPS Satellites Are Not Master Clocks
It’s natural to picture GPS satellites as autonomous master clocks, broadcasting
the time to anyone who listens. That abstraction is fine until you want position
or time better than a handful of meters or nanoseconds — and then it quietly
becomes the thing standing in your way.
Here is the question that reframed it for me. There are around 120 atomic clocks
circling the Earth, perhaps 60 of them visible at once on a good day. How would
you synchronize clocks you can’t touch?
The answer is that you don’t even try. You start them at roughly the same time,
let them drift, measure each one’s error against good clocks on the ground,
predict what that error will be shortly, and broadcast the prediction. The
receiver applies the corrections. The same trick handles the orbits. One Galileo
satellite runs about five milliseconds off — an enormous error, and entirely
harmless, because it is measured and published.
The master clocks are on Earth. They are not in space. The satellites are how
those clocks get broadcast to the rest of the planet, and the earthbound
infrastructure — orbits, clock corrections, reference frames, atmospheric models —
is what actually limits your accuracy.
Which leads to the point that reframed the whole project for me:
Same signals, better answers
The GNSS chip in your phone uses the simplest algorithms with the coarsest
models and corrections, to produce an approximate answer fast. The same
received signals, processed through more complex algorithms with far more
precise models, produce answers two to three orders of magnitude better.
The limit isn’t what arrives at your antenna. It’s what you do with it.
There is a real tradeoff underneath that, and it’s mostly about patience: fast
approximate answers versus slow precise ones. A phone wants a blue dot in three
seconds. A fixed-position clock can watch the sky for hours, and knowing that the
antenna won’t move is itself information you can exploit.
I found it easiest to picture what that patience buys in terms of things you can
hold. Process only the pseudorange signals from the satellites and you get a
quick answer that sits somewhere inside a very large beach ball — about a
meter. Move to carrier phase and it shrinks to a softball. Keep going and
you’re down to a ping-pong ball. The practical limit is about the size of a
green pea, under a centimeter. That’s the regime I was trying to work in.
The Small Effects That Stop Being Small
Once you’re chasing the last nanoseconds, a list of effects you were previously
entitled to ignore starts mattering. The talk highlights three, chosen because
they’re the ones people find least intuitive:
Intersystem bias — the constellations don’t agree with each other, so
combining GPS and Galileo means accounting for the offset between them.
Datum offsets — the land itself moves. Plate motion means a position is
only meaningful against a dated reference frame, and “where I am” has a when
attached to it.
Solid-Earth tides — the ground beneath you rises and falls roughly daily,
by enough to matter. Not the ocean. The rock.
There’s also a largely visual section on antennas, because they turn out to be a
critical part of getting precise answers and they get less attention than they
deserve.
To give you a sense of the scale, I patiently surveyed the position of an antenna
on my roof and got an answer good to about the width of a pencil eraser
east-west — but the point being surveyed is five centimeters up inside the
antenna, and higher still in a choke ring antenna. Locating an object the size of
a dinner plate to the width of a pencil eraser, when the point you care about
isn’t visible from outside, is a fair summary of the whole field.
My favorite of the small effects has the best diagnosis attached to it. Watching
the sawtooth jitter in my lab one afternoon, the pattern reversed direction
partway through, and it took me a while to work out why: I’d switched on the air
conditioning. When you compare GPS time to quartz time, you have built a very
expensive thermometer.
What I Built
PePPAR-Fix uses raw GNSS carrier phase
observations to drive a disciplined oscillator. The talk walks through the block
diagram, shows deviation plots against a simple GNSS PPS receiver for comparison,
and reports progress toward two-clock agreement.
The parts list totals about $1000, and there’s a photo of one of the
prototypes. That number matters to me: this is meant to be reproducible by
someone who wants to follow, not a demonstration that it can be done with a
budget nobody has outside of national labs.
What Working with AI Actually Looked Like
About four months of fairly intense research in 2026 took me from understanding
only the basics of GNSS timing to a much deeper appreciation of what sub-nanosecond
performance costs. Along the way I went from zero to roughly 140,000 lines of
Python for processing GNSS signals and disciplining precision oscillators.
None of it would have happened without AI, and none of it would have happened
without the pioneering work of others either.
The approach that worked for me: give the agents great power, but limit the
damage if something goes wrong. Broad authority to explore, tight bounds
on what a mistake can damage. That’s a design problem more than a trust problem,
and getting it right is what made the pace sustainable.
Concretely, that meant a command line interface rather than a chat window, and
running with permission prompts switched off — inside a virtual machine that had
root access to the lab equipment and not much else. Broad authority, small blast
radius. I ran several agents with specialized roles: research and planning,
Python coding, driving the instruments and collecting data, and analysis. Some of the
slides in the talk were made by agents to convey points I’d asked for.
The hardest lesson was about language, not code. Sloppy language is sloppy
thinking. So I had the agents build a project glossary, which every agent must
read when it starts and must maintain as new ideas arrive. Precision in the terms
turned out to be a prerequisite for precision in the clocks.
Failure resilience keeps a service running through a failure.
Backup gets your data back after one.
It’s worth being clear about which of those you’re buying, because a mirrored pool feels like a backup
right up until the moment you need one.
A ZFS mirror protects you from a drive dying.
It does absolutely nothing about rm -rf in the wrong directory,
which it will faithfully replicate to both drives at full speed.
So the useful question isn’t “am I backed up?” but “which failures does each copy of my data actually cover?”
What On-Site Backup Is For
Two things, and they’re worth naming separately because they have different recovery shapes.
Fat-finger recovery.
Somebody — probably you — deletes the wrong file, breaks a config, or upgrades something that
turns out to be a mistake.
This is by far the most common reason to reach for a backup,
and it wants frequent snapshots and a fast, low-ceremony restore.
You’ll use this one dozens of times for every time you use the others.
Local storage failure beyond what redundancy covers.
A mirror survives one drive.
A RAIDZ1 pool survives one drive.
Lose two in a RAIDZ1, or one in a stripe, and the pool is gone regardless of how good ZFS is.
Drives bought at the same time from the same batch have an unhelpful habit of failing at similar times,
which makes this less theoretical than it sounds.
On-site backup answers both, and it answers them fast, because the data is sitting on the same network.
What Off-Site Backup Is For
Also two things, and both of them are the ones you never get to practice.
Local storage failure combined with local backup failure.
The pool fails, you reach for the on-site backup, and discover that it was on the same shelf,
the same UPS, or the same controller.
Site disaster.
Fire, flood, theft, a burst pipe above the rack.
Everything in the building is gone at once, and the only copies that matter are the ones that weren’t in it.
Off-site is slow to restore from and you will hardly ever touch it.
That’s fine. It isn’t for convenience, it’s for the day the building is a write-off.
The rule this collapses to
Keep more than one copy, on more than one kind of media, with at least one copy somewhere else.
Every decision below is just working out what that costs for a given service.
The Baseline
Proxmox Backup Server does the on-site job well.
Backups are incremental and deduplicated, so keeping many restore points costs far less space than
keeping many full copies, and it can verify what it’s holding rather than assuming.
It can also sync a datastore to a second PBS elsewhere, which is the cleanest route to off-site.
My baseline is a ZFS mirror on non-ECC RAM for both the nodes and the backup server,
with every node dumping to PBS regardless of what tier its guests are in.
Even a guest with no resilience at all gets backed up,
because backup is the one thing that covers the mistake you’re actually going to make.
It’s tempting to argue that a backup server which already replicates off-site doesn’t need
storage redundancy of its own — if the pool dies, the off-site copy is still there.
That’s true, and I’d still mirror it.
A backup server that loses its pool leaves you restoring your fat-finger mistakes across a
slow link from the off-site copy, which turns a five-minute annoyance into an afternoon.
The mirror isn’t protecting the data, it’s protecting the fast path to it.
Where the Amount of Data Changes Everything
This is the part that makes backup planning messier than it first looks.
Some services carry almost no data.
A DNS resolver, an NTP server, a small internal web app: a configuration file, a package list, some logs.
These are ideal candidates for everything.
ZFS replication between nodes is nearly free, so they can run HA and fail over in seconds.
Backups are small, so you can keep many restore points and push them off-site over an ordinary
internet connection without thinking about it.
Other services churn large files continuously.
A DVR is the clearest example: hours of new video every day, most of it never watched.
Every option above gets expensive at once.
Replication would have to move gigabytes constantly, saturating the drives and the network to
protect data that mostly isn’t worth protecting.
HA is therefore off the table, which is fine — nobody is harmed by a recorder being down for an hour.
Off-site backup would need an upload budget that no residential link is going to provide,
and would burn it on footage with a shelf life measured in days.
The mistake is applying one policy to both.
If you treat the DVR like the DNS server, you’ll spend a fortune and still miss recordings.
If you treat the DNS server like the DVR, you’ll take a fifteen-minute outage
for something that could have failed over in seconds.
Service profile
Replication / HA
On-site backup
Off-site backup
Small data, critical (DNS, NTP)
Yes — replicate often, HA on
Frequent, many restore points
Yes, small and cheap
Moderate data, useful (internal apps, wikis)
Optional — replicate at a longer interval
Daily
Yes
Large churning files (DVR, media)
No
Yes, but fewer restore points
Only the irreplaceable subset
That last cell is the one worth dwelling on.
“Off-site the whole DVR” is unaffordable, but “off-site nothing from it” is usually wrong too.
There’s normally a small, precious subset — the recordings you actually kept,
the config that took an afternoon to get right — and separating that from the bulk
at the storage layout level is what makes the decision cheap.
Test the Restore
A backup you have never restored from is a hypothesis.
Restoring a guest to a different node, or to a scratch VM, takes a few minutes and tells you
whether the thing you’ve been diligently running every night actually produces a working service.
It also tells you how long a real restore takes, which is the number you’ll want when
something is broken and someone asks when it’ll be back.
I’d rather find out on a Tuesday afternoon than during the disaster.
Back to Resilience
The dividing line here — how much data a service carries — is the same one that decides which
resilience tier it belongs in.
Small-data services get HA and generous backups because both are cheap.
Large-data services get neither, and instead get a clear-eyed decision about which parts of their
data are actually worth keeping.
Work that out once per service, write it down, and most of the hard questions answer themselves.
If Murphy’s Law tells us that anything that can go wrong will go wrong,
then planning failure resilience means working through anything that can go wrong.
For each kind of failure, the question I keep coming back to is a simple one:
how long is the service outage it creates, and what does shortening that outage cost?
I adopted virtualization to modernize and simplify the administration of my network services.
Focusing on failure resilience is perhaps less common in a homelab, but it’s what I actually cared about.
The values that drive a high-end homelab overlap substantially with a small IT shop or an SMB:
a handful of services that people notice immediately when they stop, and nobody on call at 3 a.m.
This post is the entry-level version.
It is not about building something impressive.
It is about the smallest configuration that turns each failure from an evening of work into a few seconds of nothing.
Backups are the other half of this and get their own post.
Resilience keeps a service running through a failure.
Backup gets your data back after one.
They are different jobs, and it is worth being clear which one you are buying.
Hardware Baseline
I’m done with spinning drives, noisy fans, and high power consumption 24x7.
So I’ve stayed with compact, low-TDP CPUs and M.2 NVMe storage.
At the low end you’re likely to spend more on storage than on compute no matter what you do,
so I think it’s worth paying a bit more for name-brand drives with good warranties and reliability records.
I’ve stayed with the Samsung 990 line, but beware of the confusing naming.
There are three: the 990 EVO, the 990 EVO Plus, and the 990 PRO, each costing a bit more than the last.
The PRO is the one with a dedicated DRAM cache, and I don’t see that adding much value
behind the large DRAM requirements of ZFS.
The slightly higher performance of the EVO Plus likely makes no difference either,
given the limited CPU power of low-TDP parts and the network interface bottleneck in front of them.
So I’d stay with the plain 990 EVO unless you need the 4 TB density, which the EVO tops out below.
Sizing the drives, not the CPU
A node with too little CPU is slow.
A node with too little storage is a migration.
Buy the storage you’ll want in two years and the CPU you need today.
Storage Layout
ZFS is clearly the right choice for local storage here.
Ceph is a possibility for distributed storage, but it’s overkill for a homelab and it wants more nodes,
more network, and more attention than this scale justifies.
Always mirror the boot device.
A Proxmox node whose boot drive fails is a node that is simply gone until you rebuild it,
and rebuilding it is an evening, not a minute.
A two-drive ZFS mirror turns that into a drive swap you can do whenever you feel like it.
It is tempting to stripe instead, because striping two drives gets you the capacity of both.
Resist it.
What a ZFS stripe does and doesn't give you
You still get ZFS’s end-to-end checksums, copy-on-write, snapshots, and compression.
But a single drive failure destroys the whole pool.
Scrubs will still detect corruption and will not be able to repair it.
Backups and replication become your only real protection.
Failure Modes
Here is the whole exercise: list what can break, work out the outage, then decide what shortening it is worth.
Boot Device Failure
The node can’t boot because its boot device has failed.
Without mitigation, the outage runs until you have reinstalled Proxmox and restored the guests,
which realistically means hours and a lot of attention.
Configure the boot device as a ZFS mirror across two drives.
The node keeps running on the surviving drive and the outage becomes zero.
Replacing the failed drive is scheduled work rather than emergency work.
Network Link Failure
The node’s hardware is fine and the switch is fine, but the physical link between them has failed.
A cable, a port, a transceiver.
Without mitigation, everything on that node is unreachable until someone physically visits it.
Configure bonded interfaces using LACP across multiple physical links to the same switch.
Failover is sub-second and nobody notices.
Network Switch Failure
The node’s hardware is fine, but the switch it connects to has failed.
LACP to a single switch does nothing for you here — the whole bond is behind the thing that broke.
Configure multiple interfaces with MLAG using links to two different switches.
This is the point where the cost starts to climb,
because it needs a second switch and a pair that supports MLAG between them.
It is also the first mitigation on this list I would consider optional for a homelab.
Compute Failure
The physical hardware underlying a node fails in some way that isn’t storage:
loss of power, a kernel panic, a CPU that bursts into flames.
This is the one that HA is for, and it is where entry-level gets interesting.
What High Availability Actually Requires
Proxmox VE will fail a guest over to another node automatically, but only inside a cluster with quorum.
Two nodes is not a cluster
Quorum needs more than half the votes, so a two-node cluster cannot survive losing a node —
the survivor has exactly half and stops making decisions, which is the opposite of what you wanted.
Either run three nodes, or run two nodes plus a QDevice,
which is a tiny external tie-breaker that can live on a Raspberry Pi or any always-on Linux box.
The second thing to understand is where the guest’s disk lives.
Automatic failover needs the guest’s storage to be available on the node taking over.
Without shared storage, that means ZFS replication: Proxmox periodically sends snapshots of the
guest’s disk to the other nodes so a copy is already there when it’s needed.
Replication runs on a schedule, and that schedule is your data loss window.
Replicate every fifteen minutes and a node failure costs you up to fifteen minutes of that guest’s writes.
Replicate every minute and you pay for it in constant disk and network traffic.
Nothing about HA makes this go away — it is the price of not having shared storage,
and it is the number to decide deliberately rather than accept by default.
So the honest summary of automatic failover is:
the service comes back in seconds, on a slightly older copy of its data.
Putting It Together
Not everything deserves the same treatment.
I find it useful to sort guests into tiers and be explicit about what each one buys.
Tier
Node boot
On node failure
Typical guests
1
ZFS mirror with ECC RAM, replicated, HA enabled
Automatic failover in seconds, losing up to one replication interval
DNS, NTP, other critical network services
2
ZFS mirror, non-ECC RAM, replicated
Manual failover in minutes
Services people can wait a few minutes for
3
ZFS mirror, non-ECC RAM, backed up only
Restore from backup, tens of minutes upward
Bulk storage, media, anything with a lot of data
A few things are true across all of them.
The node boots to run the guest, and the guest boots to serve clients, so both need to survive a drive failure.
Some guests also touch bulk storage that is far too large to replicate.
And every node dumps to a backup server regardless of tier,
because none of the above protects you from deleting the wrong thing.
There is one more thing this table quietly assumes, and it took a blackout to show me what.
Every tier above describes what happens when a node fails, not what happens when the room does.
Three HA resolvers spread across three nodes are still one power failure away from silence,
which turned out to deserve a post of its own.
Where This Runs Out
The tiers above are really a proxy for one question: how much data does the guest carry?
A DNS resolver or an NTP server holds a configuration file and not much else.
Replicating it every few minutes is nearly free, so it can sit in Tier 1 and fail over in seconds.
A DVR churning large files is the opposite case.
Replicating it continuously would saturate the network and the drives to protect data that is
replaceable.
It belongs in Tier 3 with a sensible backup and no HA at all.
That dividing line — how much data a service carries — turns out to decide almost everything about
both its resilience and its backups, which is where the backup post
picks up.